Wednesday, January 18, 2012

My friend and Grandmother Helen

It has taken me years, but I am finally determined to finish typing my Grandma Berger's (Helen for short) life story into the computer. The pages are huge and seem to take forever to type, but I am attempting one page a day (with some success) so that I can finish it by April.
It has been really fun to learn about my Grandma. I consider Helen and me kindred spirits. I we are a lot alike (well actually maybe I am a lot like her). I talk to random strangers EVERYWHERE, I pick food of other people plates and I have been known to wrap up food in a napkin and taken it home from a restaurant in my purse. Surprisingly, these were all things that embarrassed me as a child...haha I was destined to be just like her.

Here are a few things I am learning and finding entertaining while typing Grandma Berger's life story.
  • I come from a long line of chatters
    Turns out Helen's mother was also a Chatty Cathy. Grandma points out how Grandma Rees loved to take the train back and forth from Utah to California because she liked to talk with her train compartment neighbors. She made friends with everyone and easily made conversation. So talking is something I inherited. Sorry for all those who try to get a word in when I am in the room, I was born this way. 
  • Thought this little note about my Aunt Nan's grades was funny.
    Nancy "got an “A” in sewing, “outstanding” in cooperation but “unsatisfactory” in obedience.”
  • Who is Sharon?
    When I was reading about my Great Grandma Berger's death from cancer (also a fact I never knew) I discovered a half sister I have never heard of. My Grandpa Tom Berger was previously married (news to me) and had a daughter Sharon. Who knew? Not me.
  • My mom is so cute
    I know everyone thinks this about their own mother, but my mother's baby and childhood photos are so cute. Now I know where I get it from.
Told you my Mom is cute

Friday, December 23, 2011

Christmas Decor

Not a lot going on around these parts, but I did enjoy an evening of decorating my house. Thanks to my dear mother who let me take boxes of her "filler" decor. The garland, pine cones, ornaments and other fillers are a must for great and complete decorating.

Santa seats atop of the bookcase

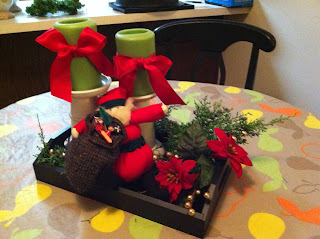
Table centerpiece...pear tablecloth is Christmasy?

It is hard to see, but that is a bowl of pine cones and snowflakes.
James Christensen Santa Claus art.

German cut-out Nativity
Coffee table centerpiece.
The reindeer is one of my sweet brass ornaments I got from my mom.
Other ornament shapes are teddy bears, toy soldiers, and toy train.

The sleigh is one of my favorite pieces.

Saturday, November 26, 2011

Easy Christmas Wreath Craft

I love Thanksgiving weekend; nothing to do for 3 whole days (I mean besides cooking and eating turkey dinners).  Friday after all the crazy Black Friday shoppers had gone home, my mom and I ventured out to JoAnn's fabric store for a few items. I was in the mood to do a holiday wreath so after 30 minutes of debating on different styles and elements of the wreath I settled on a embellished yarn wreath.
The finished product
It was actually really easy. It took about 2.5 hours (most of that time was spent winding the yarn around the wreath and resting my cramping hand as my mom wrapped gifts and we watch criminal TV shows (a family fav). 
If you like my wreath and just came to look at it then you can stop reading here. If you would like to make your own then here is what you will need to get started.
  • 1 styrofoam wreath any size you desire
  • Yarn of your color, thickness and texture choose
  • Embellishments (in my case, glittered snowflakes)
  • Ribbon for hanging the wreath
  • 1 straight pin
  • Hot glue gun and glue sticks
  • Pencil and ruller
  • And a place to display it for the world to see

Step 1: Use a pencil and ruler to mark several straight lines around the entire wreath. Because the wreath is a circle you will use these marks to make sure that your yarn continues to be straight around the entire wreath. 
Step 2: Add a dot of hot glue to the back of your wreath and glue the start of your yarn. You won't need the glue gun until the end when you cut the yarn and add the embellishments so you can turn the gun off until you get close to the end.
Step 3: String the wreath. This is the longest step. My wreath took about 2 hours to string. Your yarn will overlap on the inside circle of the wreath. This will help keep the yarn straight throughout the process. Use the pencil lines to make sure you are keeping things straight.
   Tip: Keep the yarn in a ball so you can easily pass the yarn in and around the wreath.
So close... taking a break to rest my hand.
Step 4: When you are finished covering the styrofoam wreath, turn on the glue gun and glue the end of the yarn to the back of the wreath. If you have any white from the styrofoam showing you can go back and add yarn to that area.
Step 5: Place your embellishments around the wreath in a pattern to your liking. Test the placement before gluing.
   Tip: Odd numbers are great when creating clusters.
Step 6: Use the ribbon to make a decorative holder for your wreath. The straight pin can be added to the back through the ribbon and into the styrofoam to hold the ribbon in place. this way you can easily remove the ribbon and use it for another project or gift wrapping later.

Me and my happy Christmas wreath,
or is it happy me and my Christmas wreath
Step 7: Display!

Hope you enjoyed this craft. If you didn't, it was probably because you read much further then I suggested you should.

Friday, November 11, 2011

Menu Planning: Three weeks and counting

When I was little I wanted to be a chef. But over the last few years I have become really lazy. I never cook or bake or grill. I wanted that to change. I wanted to cook and bake more. Not only because I love it or because it makes me feel like a real adult or the fact that it is a great "mommy skill", but because it is great for my pocket book and for my waistline. (Ok I am not really that concerned with my waistline, but I think it is important to be healthy.) So all around good things, right?!
As part of my goals this year I wanted to be better at making meal plans for my week and shop for only the things on my list. I am usually terrible at this because I eat out a lot and hardly go shopping and usually don't take a list. A few weeks ago I was out shopping with my mom and found cute menu planners at Anthropolgie. Maybe it is just because I love everything in that store or because it has a good simple cute design or because it is actually helpful, but I have actually planned out my meals with these little sheets of paper for the last 3 weeks. Look at me being healthy and all adult like. This also means I am learning new recipes for item 27 on my list (add tomato bisque to my list).
Check out these "What to Eat" notepads if you are like me and need a little extra (and cute to boot) help planning out your meals.

How I do it:

  1. I review my week and mark days that I will be going out for dinner with friends or on a date and mark those immediately. 
  2. I then review what I have in my cabinets and fridge to see if there is any food I need to eat before it spoils (usually not now that I am using this plan).
  3. I try to pick a combination of new recipes and standard favorites. 
  4. After filling in the menu I review the ingredients and use the back of the meal planner to write a grocery list. 
Don't forget to mark things for breakfast, lunch (usually my leftovers or easy stuff) and snacks.


If I can steal a Martha Stewart line, "It is a good thing."

Tuesday, November 1, 2011

Place of my birth (day 2)

Day 2 in Portland started with a beautiful walk down to the Williamette River and to the Portland Saturday Market. We ate fruit and got a breakfast crepe and walked around all the booths. I love craft markets. I bought a t-shirt, ring, purse and even some chocolate. Brian was a little bit better with his money, he didn't buy anything.
We also stopped by Voodoo Doughnuts. This place is doughnut heaven. Doughnut combinations only your 2nd grader mind could dream of, yet so delicious. We got the Voodoo Doll, Bacon Maple Bar (yes this one was mine), Mango Tango, and The Loop. Yummy.
We stood in line for 30 minutes for doughnuts...we are nuts
Sugar dreams
Famous pink box
Voodoo doll, stake included
Bacon love
 (yes I am the girl that like bacon chocolate too)
I think I made one like this when I was little
With our stomachs full of sugar we hopped into the car and headed to Columbia River Gorge and Multnomah Falls. I loved it. The area is so beautiful. We hiked the mile and quarter to the top of the falls and explored a little more before we had to go to the airport. Next trip we will play in the Gorge area more.


Just in case you needed a count-down
Beautiful scenes

11 of 11 (sorry for scratches)


Monday, October 24, 2011

Place of my birth (day 1 - part 2)

Oops I forgot a crucial part of day one of our trip. See remember when I said I was born in Portland and we lived in Lake Oswego until I was four. Well, my sister and her crazy memory remembers the address of our house.  So what is a trip to the place of your birth if you don't go see your house.
Here she is folks....my house. I bet the neighbors thought it was weird I was standing in the street taking photos.


And I don't remember it at all. I have a picture of me in front of the garage, but for some reason I remember it being on the opposite side of the house. Does this mean I can't claim being from Oregon if I don't remember it?

Friday, October 21, 2011

Place of my birth (day 1)

A conversation about places we had never visited one night turned into booking plane tickets and a hotel the next. Brian and I jumped on a plane last Thursday and headed to Portland. Now I can't completely say I have never been to Portland. I was actually born in Portland. My family lived in Lake Oswego until I was 4 when we moved to Utah. So technically I have been to Portland, but just not when I could remember.
The trip started out great with a great flight. We got bumped to FIRST CLASS. I have never flown first class. There is so much room in those chairs.
Here we are enjoying first class
Our first order of business in Portland...food. Breakfast was Crunchy French Toast and Salomon Hash at Mother's Bistro & Bar. Oh My Goodness! I could live on this and nothing else for the rest of my life. After breakfast we walked over to the Portlandia statue. Don't get confused with the TV show. The Portlandia statue is a huge copper statue that crouches down from atop the Michael Graves Portland Building. It was actually very beautiful.
Hello pretty lady
I think she is asking for a bite of their sandwich
And of course after breakfast we had to go to Powell Book store. Where we bought a few books including a travel book so we plan more trips.


As we walked the streets we discovered a really interesting feature about Portland. There are little cities of food carts. They were every few blocks and there would be an entire block of cart vendors.

Early in the morning so they weren't open yet.
We ended our first day in Portland with walk through the International Rose Test Garden, which came highly recommended. Too bad there were only a few blooms.

Rose Garden
Smelling the only blooms
Views of Portland 
Tall walls of foliage


Brian checking out the rose facts
Oh and did I mention that Brian has friends in Portland. We went to this really cool restaurant in an old high school; McMenamins. Day 1 was perfect.